
Circuit Diagram of Automatic Door Bell Using Object Detection: Automatic Door Bell With Object Detection Circuit

Circuit Diagram of Automatic Door Bell Using Object Detection:

Automatic Door Bell With Object Detection Circuit
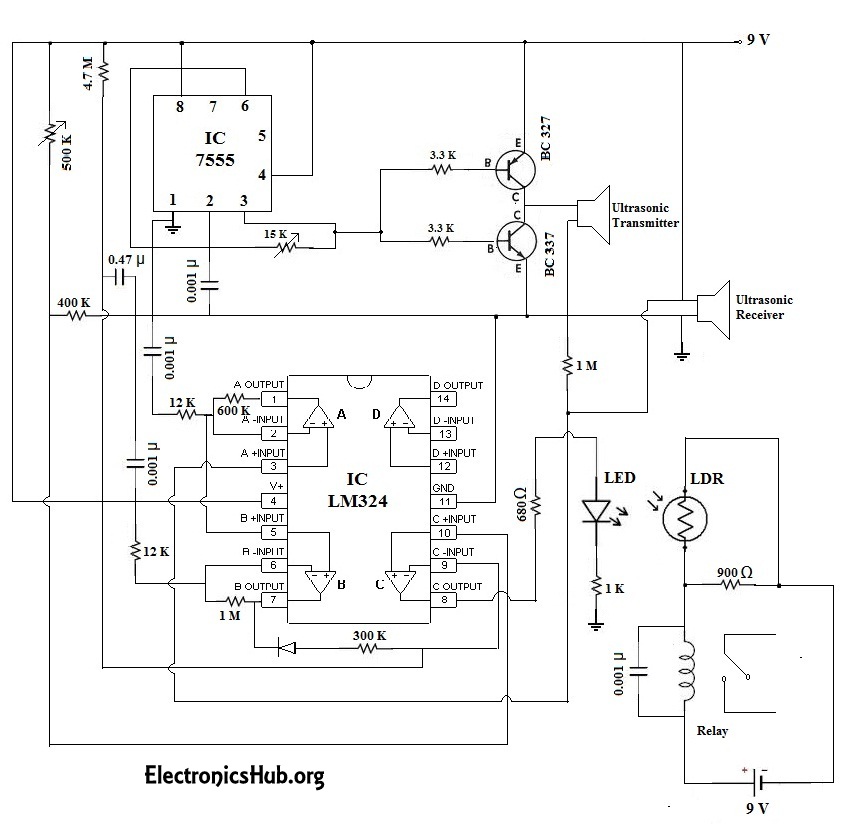
This circuit operates using a pair of ultrasonic transmitter and receiver modules which are used to detect the person and then if the person is detected, the door bell is automatically turned ON when the person is in-front of the door.
The ultrasonic transmitter operates at a frequency of about 40 Kilo-Hertz. That means it continuously transmits the ultrasonic waves of about 40KHz. The power supply should be moderate such that the range of the transmitter is only about one or two meters. If the transmitting power is less than one meter, then there is a chance that the person who is one meter away is not detected. Also, if the range is set to be very large, then it may lead to false triggering, meaning that, the objects far away from our door are considered as the visitors and the alarm rings. This can be a nuisance for us if the alarm rings for every object or person far away. So, to avoid both the problems, the transmitting power is kept to an optimum level.

The ultrasonic receiver module receives the power at the frequency same as that of the transmitter’s so that noise will be eliminated and we get less false triggering. The sensitivity of the receiver can be tuned by using the 500K-ohm variable resistor arranged as a pot in the circuit. By tuning this properly, we can achieve the desired results. The output of our circuit is given to a buzzer circuit which acts as a doorbell in our case. The receiver in this circuit uses IC LM324 which is internally has four op-amps. Out of the four op-amps, we are using only four of them and leaving the other one unused as it is not much required in our case. The three op-amps are used in cascaded arrangement to provide high gain as well as noise free output.
An opto coupler is used at the output to avoid any interaction between our circuit and the door bell.
Assemble the circuit on a PCB as compactly as possible and then attach it to your main door. Thats it! You may provide a power supply using a 9V DC adapter with filtered and regulated output. If the 9V adapter with regulated output is not available, then we recommend you to use a 12V unregulated DC adapter with 7809 voltage regulator.

Comments

Popular posts from this blog

LED DIMMER WITH CIRCUIT DIAGRAM

In this circuit, at the starting LED glow slowly, then grown brighter and once again slowly it became dim. The basis of the whole circuit is an operational amplifier IC named LM358. Circuit Diagram of LED Lamp Dimmer: LED Lamp Dimmer Circuit Diagram – ElectronicsHub.Org Working of LED Lamp Dimmer Circuit: LM358 is mainly made up of a package which contains two not dependent operational  amplifiers of high gain. The most significant attribute of these IC is that we have no need of the  independent power supply for the functioning of each comparator till the large range of the power supply. LM358 can be employed like transducer amplifier or can be worked as DC gain block etc. The huge DC voltage gain of the LM358 IC is 100db. For the only power supply this IC can work on the voltage range of 3V to 32V while for the twin power supply this IC work on the range of ±1. 5V to ±16V . And moreover large output voltage is also supported by it. Related Post: PWM LED Dimmer

WIRELESS SWITCH CIRCUIT DIAGRAM

Generally appliances that we used in our home are being controlled with the  help of devices like switches, senors. However sometimes it is dangerous to have physical contact with these switches. So to overcome these dangers, here we have explained a circuit that needs no physical contact with the appliance. In these circuits all you  need is to pass your hand  above LDR. As you first pass your hand over LDR the device connected with  it started and remain in that state till you again pass your hand above LDR. These circuits are mainly depending on two ICs. First one is LM714 which is an operational amplifier. These IC is used to increase the voltage level at the output hundred  of a thousand times as compared with  the input. Another one is most generally used JK flip flop i.e. CD4027. These IC works in toggle mode and based on the JK flip flop master slave concept. This IC is used to alter the state when the signal is given to the any one of the input terminals and

Automatic Railway Gate Controller with Circuit Diagram

The main aim of this project is to operate and control the unmanned railway gate in the proper manner in order to avoid the accidents in the unmanned railway crossing. In a country like ours where there are many unmanned railway crossings, accidents are increasing day by day. These train accidents are due to the absence of human power in the railway. In order to overcome the accidents due to the above problem we have planned to design the project. Automatic Railway Gate Control System with High Speed Alerting System is an innovative circuit which automatically controls the operation of railway gates detecting the arrival and departure of trains at the gate. It has detectors at the far away distance on the railway track which allows us to know the arrival and departure of the train. These detectors are given to microcontroller which activates the motors which open/close the railway gate correspondingly. Another feature of this circuit is that it has an intellige